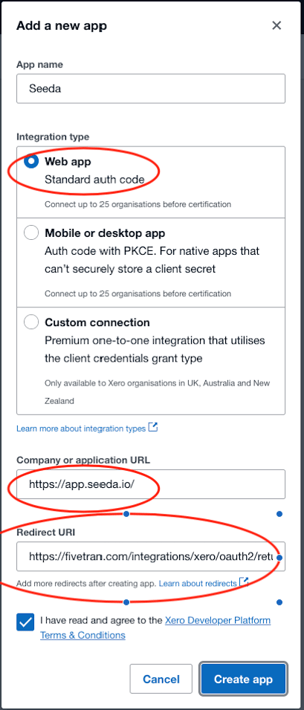
In the pop-up window, provide the following details (See screenshot below) i. Enter the App name: "Seeda". ii. Under Integration type select Web app. iii. In the Company or application URL field, enter the company URL: "https://app.seeda.io/" iv. In the Redirect URI field, enter: https://fivetran.com/integrations/xero/oauth2/return.
Click Create app.
👉 Step 2 - Generate client secret in Xero
In the Xero navigation menu, click Configuration.
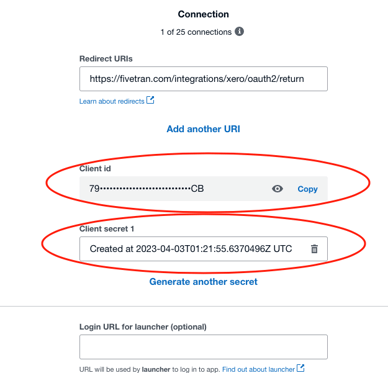
Click Generate a secret.
Make a note of the Client ID and Client Secret. You will need them to configure Seeda.
👉 Step 3 - Connect Seeda to Xero
In your Seeda dashboard, click on "Connections" in the left-hand menu, and then select "Xero." You'll need to authorize Seeda to access your Xero account.
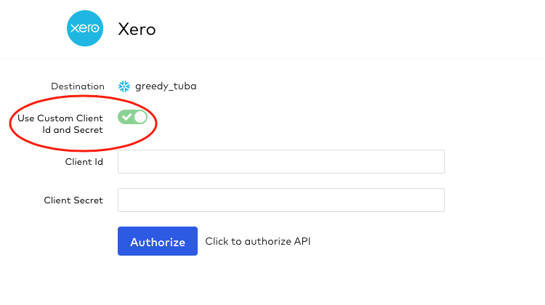
Follow the prompts to do this (see screenshot below):
Click the toggle button
Enter the Client ID and Client Secret you created in Step 2 above.
Click Authorize to authenticate the custom app access. You will be redirected to your Xero account.
Log in to your Xero account.
In the drop-down menu, select the organization you want to sync, then click Continue with organizations to grant access to the organization data.
Note: Seeda cannot connect a single organization to multiple Xero connectors. If you've already connected an organization to Seeda, you will not be able to select it again.
You will be redirected back to Seeda.
In the Organization drop-down menu, select the organization of your choice.
Click Save & Test. Seeda will take it from here and sync your data from your Xero account.
See what your marketing is actually worth
Book a no obligation demo and we will show you how Seeda measures true incremental
performance across every channel.